Showing posts with label Glitter Glue. Show all posts

Wednesday, 3 September 2014

Footprint Bee Garden Scene

2 year old girl
Materials:

  • White cardboard paper
  • Blue pastels
  • Green pastels
  • Flower shaped buttons
  • White craft glue
  • Yellow poster paint
  • Black poster paint
  • 2 googly eyes
  • Black kokie
  • Glitter glue

Thursday, 28 August 2014

Fire Fighter Hand Print


Materials:

  • Red poster paint
  • Blue glitter glue
  • Orange kokie
  • Brown kokie
  • Black kokie
  • Red kokie
  • White cardboard paper

Friday, 15 August 2014

Angel Hand and Foot Print


Materials:

  • Black cardboard paper
  • White poster paint
  • 2 googly eyes
  • Black kokie
  • Gold glitter glue

Thursday, 14 August 2014

Duck Foot Print


Materials:

  • White cardboard paper
  • Blue poster paint
  • Yellow poster paint
  • Googly eye
  • Orange kokie
  • White craft glue
  • Red glitter glue

Wednesday, 13 August 2014

Bottle Cap Fishes


Materials:
  • Blue cardboard paper
  • 4 bottle caps
  • Glitter glue
  • 4 googly eyes
  • White craft glue
  • Orange paper
  • Scissors
  • White poster paint
Method:
  1. Decorate the bottle caps with the glitter glue.
  2. Use the craft glue to stick on one googly eye per cap.
  3. Cut out 4 triangles as tail fins from the orange paper.
  4. Use the craft glue to stick the triangles onto the paper.
  5. Decorate the triangles with glitter glue.
  6. Use the craft glue to stick the bottle caps onto the card, overlapping onto the triangles.
  7. Use the white paint on the tip of a paintbrush to create bubbles.

Wednesday, 16 July 2014

Glitter Glue Rocket


4 year old


 Materials:

  • Black cardboard paper
  • White paper
  • Red paper
  • Green paper
  • 3 red buttons
  • Pritt glue
  • White craft glue
  • Scissors
  • Silver glitter glue
  • Gold glitter glue
  • Green glitter glue
Method:
  1. Cut out a 16 cm x 7 cm rectangle from the white paper.
  2. Cut out a triangle with a 7 cm base from the red paper.
  3. Cut out 2 right angled triangles from the green paper.
  4. Use the Pritt glue to stick them onto the black card to make a rocket.
  5. Take the green glitter glue and draw 3 circles below each other on the white paper.
  6. Use the craft glue to stick 1 red button in each of the green circles.
  7. Use the gold glitter glue to draw and colour in flames coming from the bottom of the rocket.
  8. Use the silver glitter glue to make dots around the rest of the black card as stars.

Wednesday, 2 July 2014

Pot of Gold at the End of the Rainbow

3 year old


Age Range: 2 years to 8 years old
Estimated Time: Under 20 minutes
Messiness: Medium

Materials:

  • White cardboard paper
  • Black cardboard paper
  • Scissors
  • Pritt glue
  • Red tissue paper
  • Orange tissue paper
  • Yellow tissue paper
  • Green tissue paper
  • Blue tissue paper
  • Purple tissue paper
  • Gold glitter glue
Method:
  1. Cut out a pot shape from the black card.
  2. Use Pritt glue to stick it onto the white card.
  3. Cut out squares from all the tissue paper colours.
  4. Using Pritt glue, paste a the squares of each colour in strips going down so that it looks like a rainbow.
  5. Use gold glitter glue to draw in gold circles to represent the "gold" in the pot.

Tuesday, 24 June 2014

Colourful Peacock


Materials:


  • White cardboard paper
  • Plastic spoon
  • Brightly coloured kokies
  • Black permanent marker
  • Scissors
  • Bostik glue
  • Glitter glue
  • Fluffy feather
Method:
  1. Fold the white card into half.
  2. Cut a section of the top part off to make a square, and thus, a rectangle when opened.
  3. Keep it folded and cut out curves on the outside of the folded card (see picture). 
  4. Open it up. It should look like the open feathers of a peacock.
  5. With different coloured kokies, colour in each section of the paper.
  6. Use glitter glue to draw spirals in each feather.
  7. Leave it to dry.
  8. Meanwhile, cut out a very small folded triangle from the white card for a beak.
  9. Colour both sides, inside and outside, of the beak orange.
  10. Draw in 2 eyes with the permanent marker.
  11. Once the feathers have dried, use Bostik to stick the spoon down the middle.
  12. Put a blob of Bostik just above the top of the spoon and stick on the feather.
Suppliers:

Monday, 16 June 2014

Clothes Peg Magnets


Age Group: 2 years (with help) to 10 years
Estimated Time: Under 15 minutes excluding drying time
Messiness: Medium

Materials:

  • Pegs (either wooden or plastic)
  • Paint (acrylic for plastic pegs, poster for wooden pegs)
  • Glitter glue
  • Bostik glue
  • Magnet strips
Method:
  1. Paint the pegs with either acrylic or poster paint, depending on the type of peg being used.
  2. Let it dry.
  3. Use Bostik glue to stick a magnet strip onto the under side of the peg.
  4. Decorate the top of the peg as desired.
  5. Let it dry completely before using.

Picture Frame

Brilliant for older kids with good concentration.


Age Group: 6 years to 10 years
Estimated Time: 15 - 30 minutes
Messiness: Medium

Materials:

  • Coloured cardboard paper
  • Coloured ice-cream sticks
  • White craft glue
  • Scissors
  • Buttons
  • Glitter glue
Method:
  1. We started first by designing the frame on the A4 piece of card and came up with this design for a frame.
  2. We used white craft glue to stick it down onto the card.
  3. I then drew a very simple picture with glitter glue. Kgosi (age 8) decided to use one of his own photo's from his birthday to frame.
  4. We then cut the cardboard to size once everything had dried.

Sunday, 15 June 2014

Pet Rock

Pet rocks are simple yet fun to make and have no design limitations!


Age Group: 2 years (with help) to 8 years
Estimated Time: Under 30 minutes
Messiness: Medium

Materials:

  • Rock
  • Acrylic paint
  • Googly eyes
  • Pipe cleaners
  • Pom-poms
  • Any other decorative material
Method:
  1. Make sure your rock is clean and dry.
  2. Choose any colour or colours of acrylic paint to paint your rock.
  3. Once dry, decorate in any way your imagination takes you!
  4. If you want, add glitter to the wet paint to create a lovely shimmering effect.

Saturday, 14 June 2014

Plastic Spoon Angel


Age Group: 2 years (with help) to 8 years
Estimated Time: Under 15 minutes
Messiness: Medium

Materials:

  • Plastic spoon
  • Cupcake liner
  • Bostik glue
  • Glitter glue
  • Gold pipe cleaner
  • Black permanent marker
  • Scissors
  • Cellotape
Method:
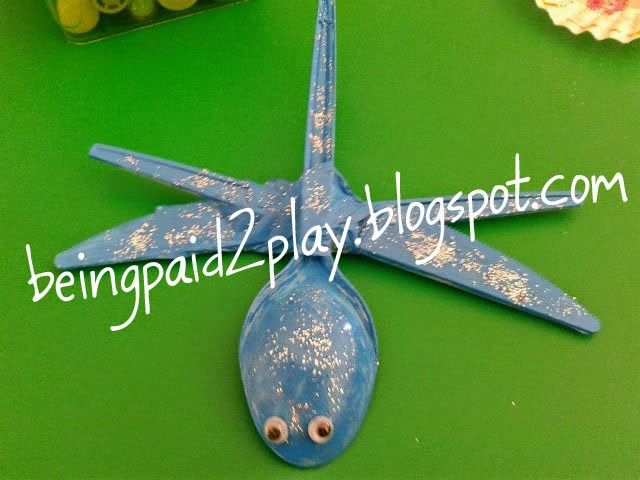
  1. Flatten out the cupcake liner and fold into half.
  2. Cut a triangle into each side so that when you open it up, it creates a wing on either side.
  3. Use Bostik glue to stick the spoon down the middle of the cupcake liner.
  4. Decorate the cupcake liner with glitter glue.
  5. Twist a small piece of gold pipe cleaner into a circle and secure it on the top of the spoon with cellotape to mimic a halo.
  6. Use a permanent marker to draw on a face for your angel.

Plastic Knife and Spoon Dragonfly


Age Group: 4 years (with help) to 10 years
Estimated Time: Under 15 minutes
Messiness: High


Materials:
  • 2 plastic knives
  • 1 plastic dessert spoon
  • Masking tape
  • ACRYLIC paint (poster paint just peels off)
  • 2 googly eyes
  • Glitter (optional)


Method:
  1. Use the masking tape to join the 2 knives together at an angle to create the wings
  2. Use masking tape to connect the dessert spoon (round side up) to the top of the knives. They should connect just where the base of the spoon starts.
  3. Use any colour ACRYLIC paint. Remember to paint the bottom of the dragonfly too!!
  4. Whilst the paint is still wet, sprinkle on some glitter. Dipping a paint brush into dry glitter and daubing it onto the wet paint works brilliantly.
  5. Once dry, stick on the googly eyes.  

Footprint Insects

These are easy and simple to make. Kids love getting their hands and feet painted and enjoy the feeling of the paintbrush on their skin! The look on their faces when they see what their feet and hands have been turned into is absolutely priceless!!


Materials:
  • Poster paint
  • Googly eyes
  • Black kokie
  • Glitter glue