Showing posts with label Glitter. Show all posts

Thursday, 18 September 2014

Glitter Tarantula

3 year old boy


4 year old boy
Materials:
  • Black cardboard paper
  • 8 clothes pegs
  • 8 googly eyes of different sizes
  • White craft glue
  • Glitter
  • Scissors
  • Paper plate
Method:
    2 year old girl
  1. Cut out a circle shape from the black card.
  2. Use craft glue to stick on the 8 googly eyes.
  3. Pour the glitter onto the paper plate and spread it so that it is even.
  4. Spread a thin layer of craft glue onto one side of each peg.
  5. Place the glued side of each peg into the glitter.
  6. Pick up and shake off the excess glitter.
  7. Leave to dry.
  8. Once dried, peg onto the sides of the circles to make spiders!

Wednesday, 3 September 2014

Exploding Volcano

Materials:

  • Brown paper
  • Black cardboard paper
  • White craft glue
  • Cotton wool puffs
  • Bronze glitter
Method:
  1. Cut out a volcano shape from the brown paper and stick it onto the black card.
  2. With the craft glue, draw lines down the volcano and coming out of the volcano.
  3. Sprinkle the bronze glitter over the glue and shake off any of the excess glitter.
  4. Once the glitter has dried, spread craft glue over the top of the volcano and stick on the cotton wool puffs as the smoke.

Thursday, 7 August 2014

Frozen (Movie) Party Craft Ideas

Olaf Footprint Gift Bag


Materials:

  • Brown cardboard gift bag
  • White poster paint
  • Orange felt
  • 2 googly eyes
  • White craft glue
  • Scissors
  • Black kokie
  • Pastels
  • A foot!!
Method:
  1. Paint your child's foot with the white poster paint and place it in the centre of the bag.
  2. Wait for it to dry.
  3. Use the black kokie to draw the outlines to 3 sections within the footprint for Olaf's body.
  4. Draw eyebrows, a mouth and a tooth.
  5. Use craft glue to stick on 2 googly eyes.
  6. Cut out a small carrot shaped nose from the orange felt and stick it into place.
  7. Use a blue pastel to colour in the mouth.
  8. Use a brown pastel to draw in arms and hair.
  9. Use a black pastel to draw in his "buttons".
  10. Use the pastels to decorate the background.

Sven Reindeer Horn "Crown"


Materials:
  • 1 A3 piece of brown foam
  • Scissors
  • Brown/copper glitter
  • White craft glue
  • Jewels/decorations
  • Stapler and staples
Method:
  1. Cut out 2 strips about 5 cm high from the foam.
  2. Cut out 2 horns from the foam.
  3. Spread craft glue over the antlers and generously sprinkle the glitter over the glue.
  4. Shake off any excess glitter and wait for it to dry.
  5. Use the craft glue to decorate the 2 strips of foam.
  6. Staple the ends of the foam together, measure the child's head to make sure the band is not too big or too small.
  7. Use craft glue to glue the antlers to the band.


Princess Elsa Crown


Materials:
  • 1 A3 piece of white foam
  • Silver glitter
  • Blue glitter
  • White craft glue
  • Scissors
  • Variety of jewels/decorations
  • Stapler and staples
Method:
  1. Cut out a 5 cm high strip from the white foam for the head band.
  2. From the rest of the foam, cut out the crown shape, making sure there is about 2 cm left on each side to staple the band to. 
  3. Spread glue on the top outline of the crown and generously sprinkle on blue glitter.
  4. Shake off any excess glitter.
  5. Spread glue on the rest of the crown and generously sprinkle on the silver glitter.
  6. Shake off any excess glitter.
  7. Once dried, use the craft glue to stick on the decorations.
  8. Staple the band to the ends of the crown, measure the child's head to make sure the band is not too big or too small.

Olaf Paper Bag


Materials:
  • Brown paper bag
  • White poster paint
  • 2 googly eyes
  • Brown kokie
  • 3 brown pipe cleaners
  • Orange felt
  • Scissors
  • Blue kokie
  • White foam
  • White craft glue
  • 3 small black pom-poms
  • Cellotape
Method:
  1. Paint one side of the paper bag white.
  2. Leave to dry.
  3. Whilst drying, cut out a rectangle with curved corners out of the white foam for the tooth.
  4. Bend one of the pipe cleaners in half and cut it to make 2 equal parts.
  5. Bend one half around one of the full pipe cleaners to create a stick arm. Do this with the other 1 and a half pipe cleaners.
  6. From the orange felt, cut out a carrot shaped nose.
  7. Once the bag has dried, use the craft glue to stick on the two googly eyes, nose, and 3 pom-poms.
  8. Use the brown kokie to draw in eyebrows.
  9. Use the blue kokie to draw and colour in a mouth.
  10. Use the craft glue to stick the tooth onto the mouth.
  11. Use the cellotape to secure the arms onto each side of the paper bag.


Sven Paper Bag


Materials:

  • Brown paper bag
  • 4 beige fluffy pipe cleaners
  • 2 googly eyes
  • Brown felt
  • Brown button
  • White craft glue
  • Scissors
  • Cellotape
Method:
  1. From the brown felt, cut out an oval shape.
  2. Use the craft glue to stick the oval shape (snout) onto the middle of the paper bag.
  3. Use craft glue to stick the button onto the middle of the snout - you can always use a pom-pom instead of a button should you wish.
  4. Use the craft glue to stick the 2 googly eyes into place.
  5. Take 2 of the pipe cleaners and twist them together to make a cross shape. Do this with the other pair.
  6. Cellotape the long end of the "cross" onto the inside  of the paper bag.
  7. Bend the 3 other sections any way you wish to create antlers.

Tuesday, 5 August 2014

Night Time Forest


Materials:
  • Black cardboard paper
  • White craft glue
  • Silver glitter
  • 12 googly eyes of different sizes (6 pairs)
  • Yellow cardboard paper
  • Scissors
  • Twigs
Method:
  1. Spread craft glue evenly all over the black card.
  2. Generously sprinkle the silver glitter so that all of the glue is covered.
  3. Shake off any excess glitter and leave to dry.
  4. From the yellow card, cut out a moon shape.
  5. Once the glitter has dried, stick the moon onto the top left corner.
  6. Use the craft glue to stick on the twigs. You may need to hold them down for a couple of seconds for them to stick properly.
  7. Use the craft glue to stick down various sized pairs of googly eyes in between the twigs.

Tuesday, 17 June 2014

Glitter Fish


Age Group: Under 2 years to 5 years
Estimated Time: Under 15 minutes
Messiness: Medium

Materials:


  • Glitter
  • Small beads
  • White craft glue
  • 1 piece of coloured cardboard paper
  • Kokies or crayons
  • Ice-cream stick
  • Scissors
  • A little hand!!
Method:
  1. Trace your child's hand onto the coloured card and cut it out.
  2. Decorate the cut-out with kokies or crayons.
  3. Once finished, apply a thin layer of white craft glue all over the decorated side of the fish.
  4. Sprinkle the little beads and glitter onto the glue.
  5. Use craft glue to stick an ice-cream stick onto the back of the fish.

Monday, 16 June 2014

Picture Frame

Brilliant for older kids with good concentration.


Age Group: 6 years to 10 years
Estimated Time: 15 - 30 minutes
Messiness: Medium

Materials:

  • Coloured cardboard paper
  • Coloured ice-cream sticks
  • White craft glue
  • Scissors
  • Buttons
  • Glitter glue
Method:
  1. We started first by designing the frame on the A4 piece of card and came up with this design for a frame.
  2. We used white craft glue to stick it down onto the card.
  3. I then drew a very simple picture with glitter glue. Kgosi (age 8) decided to use one of his own photo's from his birthday to frame.
  4. We then cut the cardboard to size once everything had dried.

Sunday, 15 June 2014

Pet Rock

Pet rocks are simple yet fun to make and have no design limitations!


Age Group: 2 years (with help) to 8 years
Estimated Time: Under 30 minutes
Messiness: Medium

Materials:

  • Rock
  • Acrylic paint
  • Googly eyes
  • Pipe cleaners
  • Pom-poms
  • Any other decorative material
Method:
  1. Make sure your rock is clean and dry.
  2. Choose any colour or colours of acrylic paint to paint your rock.
  3. Once dry, decorate in any way your imagination takes you!
  4. If you want, add glitter to the wet paint to create a lovely shimmering effect.

Saturday, 14 June 2014

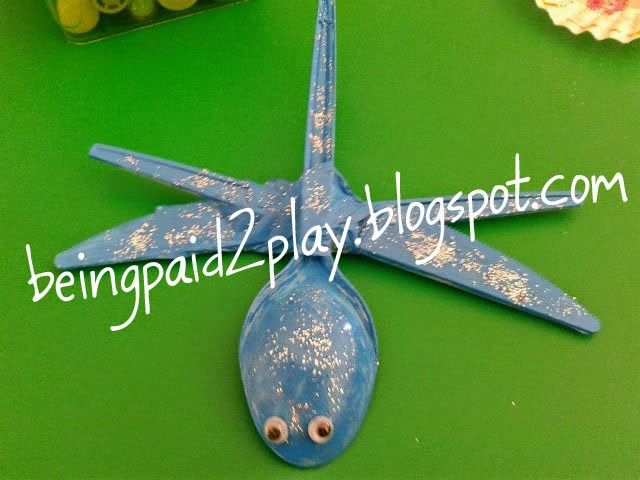
Plastic Knife and Spoon Dragonfly


Age Group: 4 years (with help) to 10 years
Estimated Time: Under 15 minutes
Messiness: High


Materials:
  • 2 plastic knives
  • 1 plastic dessert spoon
  • Masking tape
  • ACRYLIC paint (poster paint just peels off)
  • 2 googly eyes
  • Glitter (optional)


Method:
  1. Use the masking tape to join the 2 knives together at an angle to create the wings
  2. Use masking tape to connect the dessert spoon (round side up) to the top of the knives. They should connect just where the base of the spoon starts.
  3. Use any colour ACRYLIC paint. Remember to paint the bottom of the dragonfly too!!
  4. Whilst the paint is still wet, sprinkle on some glitter. Dipping a paint brush into dry glitter and daubing it onto the wet paint works brilliantly.
  5. Once dry, stick on the googly eyes.